How to Assemble 3D Reports
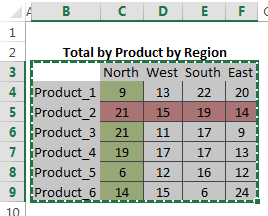
It’s fairly straight forward to create a 3D financial report like the one above. Each visible side of the cube is a table in your workbook. Here are the 3 you can see in the cube above:

You then select one range at a time and press CTRL+C to copy the range to the clipboard:

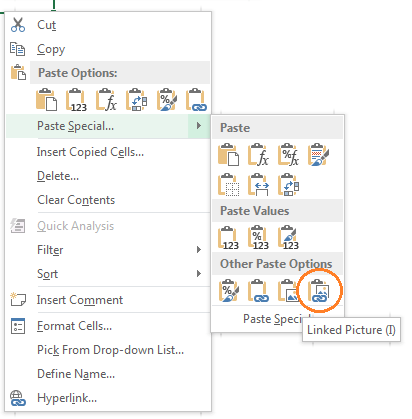
In the Paste Special menu choose Paste Linked Picture:

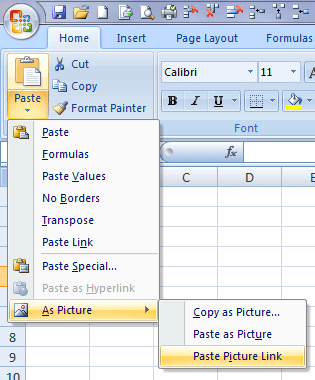
In Excel 2007 the menu for pasting a Picture Link is slightly different:
 I
I
Note: Unfortunately in Excel 2007 you cannot apply the 3D effects to the linked picture so that's as far as you can go 🙁
Tip: the great thing about using a Linked Picture is if any of the values or formats in the table change you will see them instantly update in your cube too. No need to copy the table again.
Pasting the range of cells you copied as a linked picture results in an image that is an object which hovers above the cells of your worksheet, in the same was as picture does.
Next use the Picture Effects (Picture Tools > Format menu) on the Ribbon to apply 3D effects to the image:
How to Assemble 3D Reports
It’s fairly straight forward to create a 3D financial report like the one above. Each visible side of the cube is a table in your workbook. Here are the 3 you can see in the cube above:

You then select one range at a time and press CTRL+C to copy the range to the clipboard:

In the Paste Special menu choose Paste Linked Picture:

In Excel 2007 the menu for pasting a Picture Link is slightly different:

Note: Unfortunately in Excel 2007 you cannot apply the 3D effects to the linked picture so that's as far as you can go 🙁
Tip: the great thing about using a Linked Picture is if any of the values or formats in the table change you will see them instantly update in your cube too. No need to copy the table again.
Pasting the range of cells you copied as a linked picture results in an image that is an object which hovers above the cells of your worksheet, in the same was as picture does.


No comments:
Post a Comment